
Mastering Flask: A Comprehensive Web Development Series for Python Enthusiasts
Article 4: Templates and Static Files


Be Sure to Complete the Series
In this Flask web development series, we'll dive deeper into Flask and cover topics that build on the basics introduced in the first article. We'll explore more advanced features of Flask, including database integration, user authentication, and RESTful APIs. We'll also show you how to use Docker to containerize your Flask application, simplify deployment, and set up CI/CD with GitHub Actions to automate testing and deployment. By following this series, you'll gain a comprehensive understanding of Flask and its ecosystem, and easily build robust, scalable web applications. So follow the entire series to get the most out of your Flask learning journey.
Learning Outcomes
Upon completing this lesson on Flask, learners will be able to:
Design and implement Flask templates that incorporate static files, such as images and stylesheets, for a more polished and professional look and feel
Utilize template inheritance in Flask to minimize repetitive code and make it easier to manage larger and more complex projects
Effectively handle web form submissions in Flask, including form validation and displaying error messages to users
Store data in MongoDB using Flask
Responsive and dynamic user experience
If you feel stuck please check the github repo to get some help.
Link: https://github.com/ritwikmath/Mastering-Flask/tree/article-four
Streamlining the Project
To simplify the project's code and make it easier to read, we've decided to exclusively use MongoDB for storing all data going forward. To streamline the project dependencies and make it more efficient, we recommend removing all module names from the requirements.txt file except for Flask and PyMongo. After making the necessary changes, it's important to run "pip3 freeze" to ensure that the dependencies are properly updated and to avoid any compatibility issues. Run pip3 install -r requirements.txt and install dependencies again. Finally, the requirements.txt should contain the following modules (which May change over time).
click==8.1.3
colorama==0.4.6
dnspython==2.3.0
Flask==2.2.3
itsdangerous==2.1.2
Jinja2==3.1.2
MarkupSafe==2.1.2
pymongo==4.3.3
Werkzeug==2.2.3
It is crucial to activate the virtual environment before working on the project. Failure to do so may result in compatibility issues, incorrect dependency usage, and potential conflicts. Always double-check that the virtual environment is active before making any changes to the project. How to create and active virtual env available here.
To eliminate the dependency on MySQL, modifications need to be made to the code. It's recommended that you try making these changes yourself to gain experience with MongoDB (which was covered in article two, available here). However, if you're pressed for time or simply want to reference this article alone, you can download the initial code in zip format from the project's GitHub repository. Comment all the code in mysql.py within the database folder.
Link: https://github.com/ritwikmath/Mastering-Flask/tree/65c471aab86290015af7e81cd969e555310c4058

For reference on how to remove MySQL dependency yourself, you can review the logs route. Moreover, we have provided an example of how to update a developer below:
@developer_bp.patch('/<string:id>')
def update(id):
    try:
        result = Mongo().db.developers.find_one_and_update(
            {'_id': ObjectId(id)},
            {'$set': request.json},
            upsert=True,
            new=True
        )
        Mongo().db.logs.insert_one({
            'type': 'activity',
            'url': request.url,
            'function': 'update a developer'
        })
        return {'status': True, 'data': json.loads(json.dumps(result, default=str))}
    except Exception as ex:
        Mongo().db.logs.insert_one({
            'type': 'error',
            'url': request.url,
            'message': ex.__str__()
        })
        return {'status': False, 'error': ex.__str__()}
It's crucial to use string:id instead of int:id in the route, as this is necessary for proper handling of object IDs in MongoDB. Since object IDs in MongoDB are represented as strings. This change is necessary to avoid a potential 404 error being thrown by Flask. If int:id is used and the ID contains any non-numeric characters, Flask will throw a 404 error as it expects an integer parameter. Therefore, updating the route to string:id will ensure that the ID is properly handled and prevent any unexpected errors.
The code result = Mongo().db.developers.find_one_and_update({'_id': ObjectId(id)}, {'$set': request.json}, upsert=True, new=True) updates a record in a MongoDB database using the information provided in a JSON format. The record to be updated is found by searching for its unique ID, which is stored in the '_id' field. If no document exists with the specified ID, upsert=True tells the database to create a new document. new=True is an optional parameter that tells the database to return the updated document after the update operation is complete. Without this parameter, the database would return the original document before the update.
First, remove the MySQL dependencies from app.py. Once removed, proceed to update the code in developers.py within the route folder to use MongoDB instead of MySQL. Here's an example of what app.py might look like after removing the MySQL dependency:
from flask import Flask, request
from datetime import datetime
from database.mongo import Database as Mongo

app = Flask(__name__)

@app.before_request
def logRequest():
    if request.path in ['/', '/logs']:
        return
    Mongo().db.logs.insert_one({
        'type': 'request',
        'client_addr': request.remote_addr,
        'url': request.url,
        'http_method': request.method,
        'body': request.method in ['POST', 'PATCH'] and request.get_json() or None,
        'created_at': datetime.now()
    })

if __name__ == '__main__':
    Mongo().connect()
    from route.logs import log_bp
    from route.developers import developer_bp
    from route.home import home_bp
    app.register_blueprint(log_bp)
    app.register_blueprint(developer_bp)
    app.register_blueprint(home_bp)
    app.run(debug=True)
Templates and Static Files
Flask utilizes the Jinja2 template engine to dynamically render HTML files, which are known as templates. Templates provide a way for developers to separate presentation logic from application logic, and the use of a template engine allows for dynamic content to be displayed within the HTML. Jinja2 provides a range of syntax options for different operations within a template, allowing for the creation of dynamic web pages that can display data in real-time. Overall, the use of templates and a template engine like Jinja2 makes it easier for developers to create complex web pages that are both visually appealing and functional.
Static files are generally those whose content remains unchanged over time, and Flask offers built-in support for serving such files. Flask creates a "/static" route that points to a "static" directory within the root directory of the project. This means that static files such as images, stylesheets, and JavaScript files can be easily served to the client's web browser without the need for additional configuration.
Problem Statement
Develop two separate templates for login and registration pages in a Flask application. Process the data submitted by users and implement authentication using Flask session. Additionally, display appropriate error messages on the browser to notify users of any issues encountered during the authentication process.
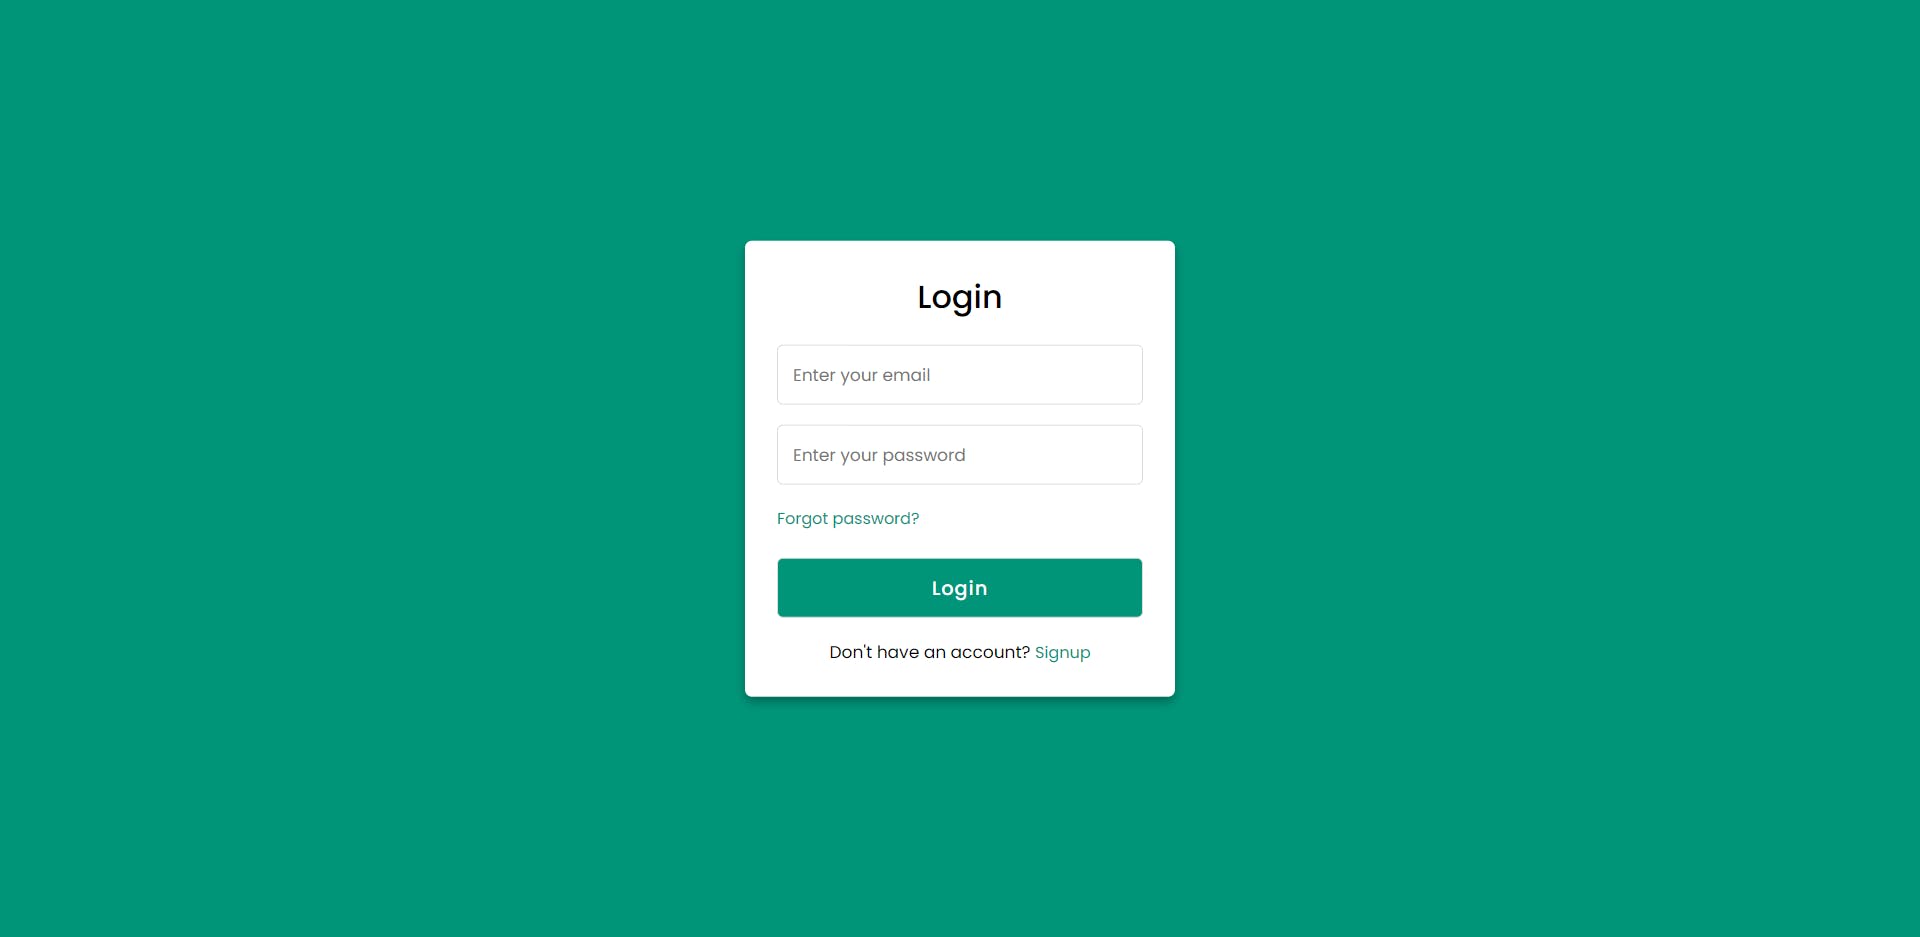
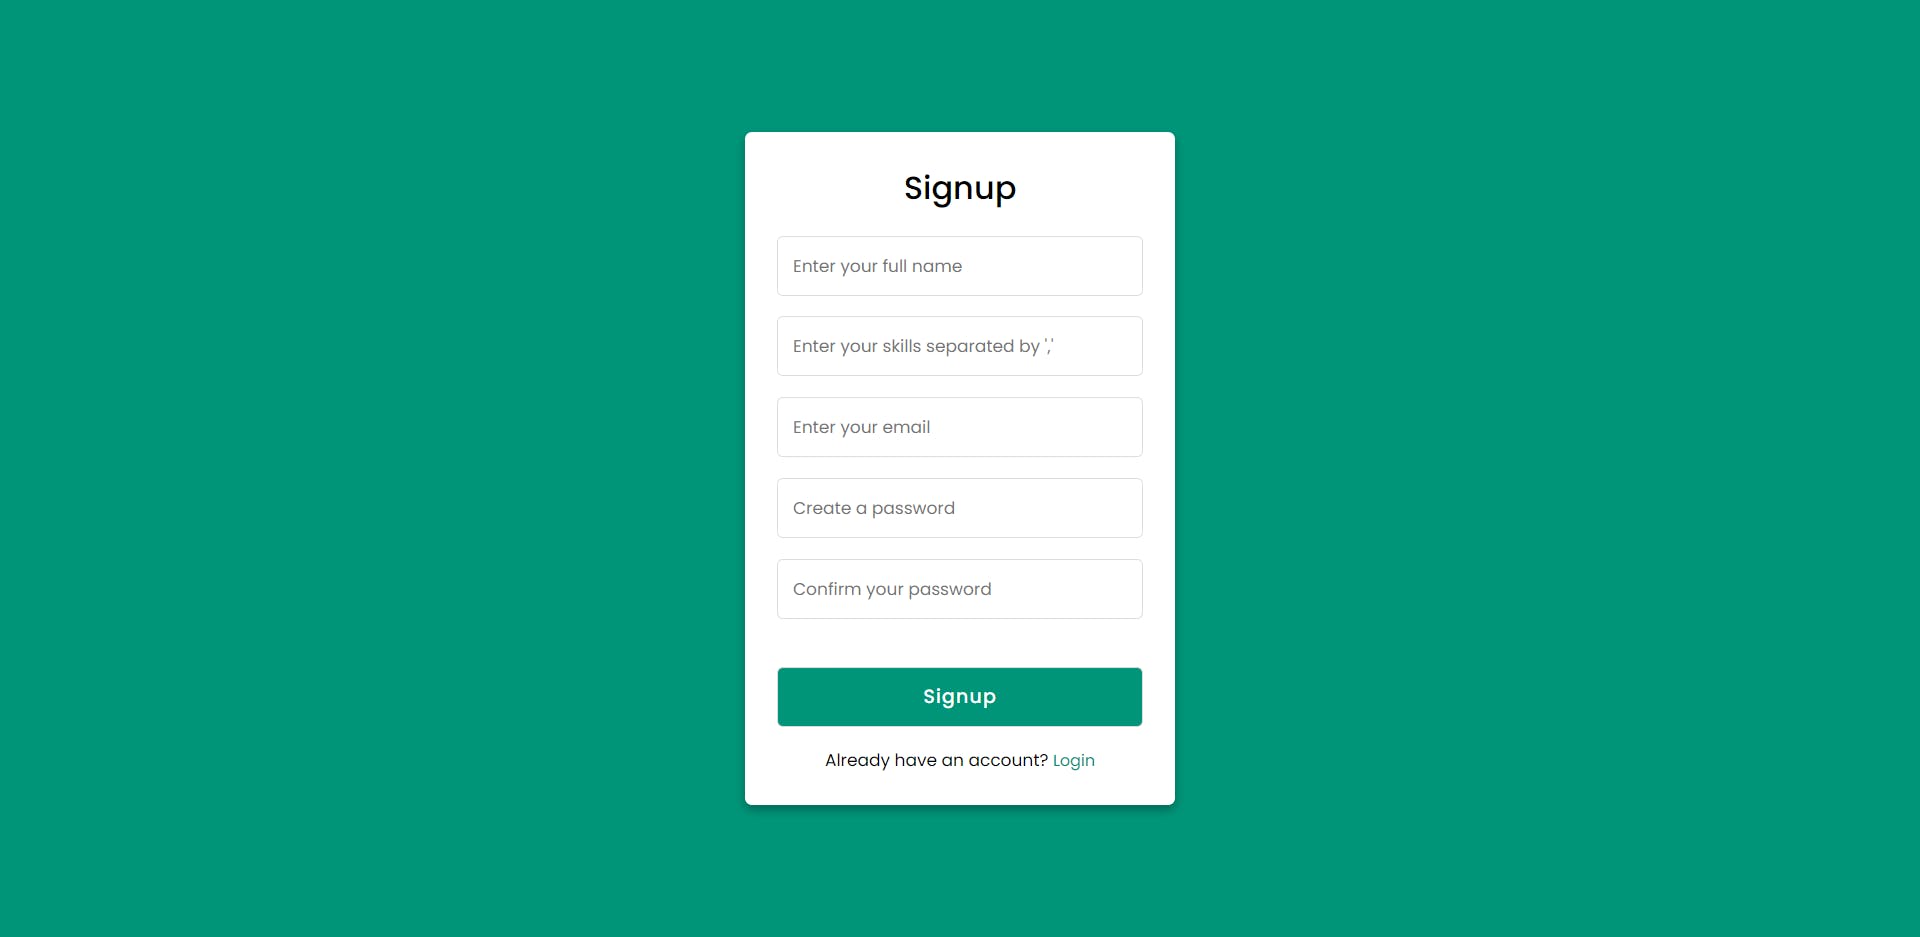
Login and Register Forms
base.html
<!DOCTYPE html>
<html lang="en">
<head>
    <meta charset="UTF-8">
    <meta http-equiv="X-UA-Compatible" content="IE=edge">
    <meta name="viewport" content="width=device-width, initial-scale=1.0">
    <title>{% block title %}{% endblock %}</title>
    <link rel="stylesheet" href={{ url_for('static', filename='style.css') }}>
</head>
<body>
    {% for message in get_flashed_messages() %}
        <div class="error">{{ message }}</div>
    {% endfor %}
    <div class="container">
        {% block content %}{% endblock %}
    </div>
</body>
</html>
login.html
{% extends 'base.html' %}

{% block title %}Login{% endblock %}

{% block content %}
<div class="login form">
    <header>Login</header>
    <form method="POST" action="#">
      <input name="email" type="text" placeholder="Enter your email">
      <input name="password" type="password" placeholder="Enter your password">
      <a href="#">Forgot password?</a>
      <input type="submit" class="button" value="Login">
    </form>
    <div class="signup">
      <span class="signup">Don't have an account?
       <a href="{{url_for('home.registerForm')}}">Signup</label>
      </span>
    </div>
</div>
{% endblock %}
register.html
{% extends 'base.html' %}

{% block title %}Register{% endblock %}

{% block content %}
<div class="registration form">
    <header>Signup</header>
    <form method="POST" action="#">
      <input name="name" type="text" placeholder="Enter your full name">
      <input name="skills" type="text" placeholder="Enter your skills separated by ','">
      <input name="email" type="text" placeholder="Enter your email">
      <input name="password" type="password" placeholder="Create a password">
      <input name="confirm_password" type="password" placeholder="Confirm your password">
      <input type="submit" class="button" value="Signup">
    </form>
    <div class="signup">
      <span class="signup">Already have an account?
       <a href="{{url_for('home.loginForm')}}">Login</label>
      </span>
    </div>
</div>
{% endblock %}
To begin with, you need to generate three template files, namely base.mtl, login.html, and register.html, in the designated template folder. The main aim of base.html is to provide a uniform style and layout for the login and register pages. The benefit of having a layout file is that it ensures consistency across different pages, which makes it easier for users to navigate and understand the website.
The base.html file includes a link to the css file and a flash message display container. It also comprises two blocks, namely title and content. The child template will provide the title that will be displayed on the browser title, while the content block contains the actual form scripts. Both the login and register templates inherit the base template and insert the required data into the title and content blocks.
Each form has a hyperlink that, when clicked, directs the user to the URL generated by the Flask url_for function for the registerForm or loginForm function within the home blueprint.
/* Import Google font - Poppins */
@import url('https://fonts.googleapis.com/css2?family=Poppins:wght@200;300;400;500;600;700&display=swap');
*{
  margin: 0;
  padding: 0;
  box-sizing: border-box;
  font-family: 'Poppins', sans-serif;
}
body{
  min-height: 100vh;
  width: 100%;
  background: #009579;
}
*******
To serve a static CSS file to the templates, you need to create a folder named "static" in the root directory of your project. Inside this folder, create a file called "style.css". This file will contain the CSS rules and styles that you want to apply to your web pages. To link this CSS file to your templates, you can use the Flask url_for function to generate a URL for the static file. The url_for function takes the name of the file as an argument and returns a URL that can be used in the href attribute of the link tag. By using the url_for function to link the CSS file, Flask will automatically handle the URL generation and file serving, making it easy to manage your static files.
To access the templates from a web browser, you need to create new views in your Flask application. Each view will be associated with a specific URL, and when a user visits that URL in their browser, the corresponding template will be rendered and displayed. By creating new views for your templates, you can provide users with a way to interact with your web application and view dynamic content. These views can be created using Flask's built-in routing capabilities, which allow you to map URLs to Python functions that generate the dynamic content to be displayed.
from flask import Blueprint, render_template
from database.mongo import Database as Mongo
import json

home_bp = Blueprint('home', __name__)

@home_bp.get('/')
def dashboard():
    logs = list(Mongo().db.logs.find({}))
    return render_template('dashboard.html', logs=json.loads(json.dumps(logs, default=str)))

@home_bp.get('/login')
def loginForm():
    return render_template('login.html')

@home_bp.get('/register')
def registerForm():
    return render_template('register.html')
Open home.py in the route folder and add loginForm and registerForm views.
The first view function is named loginForm() and is mapped to the URL /login. When a user navigates to this URL in their web browser, Flask will execute the loginForm() function and return the HTML content of the login.html template to the browser, which will then display it. Similarly, the second view function is named registerForm() and is mapped to the URL /register. When a user visits this URL in their web browser, Flask will execute the registerForm() function and return the HTML content of the register.html template to the browser. By creating these views, you can provide users with a way to interact with your web application and view dynamic content. These views are created using Flask's built-in routing capabilities, which allow you to map URLs to Python functions that generate the dynamic content to be displayed.
The HTML and CSS code is taken from codinglabweb. Check out their website in the resource block.
Handling Form Request
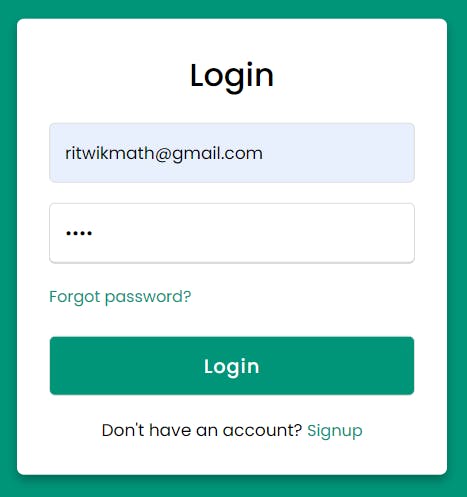
To handle form submission, you need to register two additional routes in your Flask application. You can create an auth.py file in your routes folder and define the login and register views associated with their respective routes. Additionally, you should update the action values in both forms to ensure that the data is sent to the correct route.
Login Form
<form method="POST" action="{{url_for('auth.login')}}">
Register form
<form method="POST" action="{{url_for('auth.register')}}">
Create a blueprint named auth and give url_prefix '/auth' to it. Register the blueprint within the app in the app.py file, like other blueprints.
@auth_bp.post('/login')
def login():
    try:
        developer = Mongo().db.developers.find_one({
            'email': request.form['email']
        })
        if not developer:
            raise NotFound('Email is not registred')
        match = check_password_hash(developer.get('password'), request.form['password'])
        if not match:
            raise BadRequest('Password did not match')
        return redirect(url_for('home.dashboard'))
    except Exception as ex:
        flash(ex.__str__())
        return redirect(url_for('home.loginForm'))
A view named login for a Flask application using the @auth_bp.post('/login') decorator. This view function handles a POST request sent to the /login route. When a user submits a login form, the view function attempts to retrieve the user's email from the form data and uses it to retrieve the corresponding user from a MongoDB database. If the user is not found, the function raises a NotFound exception with the message "Email is not registered". If the user is found, the function checks whether the password entered by the user matches the stored password using the check_password_hash function provided by the Flask-Bcrypt extension. If the password does not match, the function raises a BadRequest exception with the message "Password did not match".
If the email and password are correct, the function redirects the user to the dashboard endpoint using the redirect function provided by Flask. If an exception is raised during this process, the function catches it and uses the flash function provided by Flask to store the error message in a message queue. Finally, the function redirects the user back to the login form using the redirect function and the url_for function to generate the URL for the login form endpoint.
@auth_bp.post('/register')
def register():
    try:
        developer = Mongo().db.developers.find_one({
            'email': request.form['email']
        })
        if developer:
            raise BadRequest('Email is already registred')
        if request.form['password'] != request.form['confirm_password']:
            raise BadRequest('Password did not match')
        password = generate_password_hash(request.form['password'], method='pbkdf2:sha256', salt_length=9)
        skills = request.form['skills'].split(',')
        Mongo().db.developers.insert_one({
            'name': request.form['name'],
            'skills': skills,
            'password': password,
            'email': request.form['email']
        })
        return redirect(url_for('home.loginForm'))
    except Exception as ex:
        flash(ex.__str__())
        return redirect(url_for('home.registerForm'))
This code defines a view function named register for a Flask application using the @auth_bp.post('/register') decorator. This view function handles a POST request sent to the /register route.
When a user submits a registration form, the view function attempts to retrieve the user's email from the form data and uses it to check whether the user is already registered in a MongoDB database. If the user is already registered, the function raises a BadRequest exception with the message "Email is already registered".
If the user is not already registered, the function checks whether the password and confirm password fields match. If they do not match, the function raises a BadRequest exception with the message "Password did not match". If the password and confirm password fields match, the function generates a hashed password using the generate_password_hash function provided by the Flask-Bcrypt extension.
The function then splits the user's skills entered as a comma-separated string into a list and inserts the user's name, skills, hashed password, and email into the MongoDB database. Finally, the function redirects the user to the login form using the redirect function and the url_for function to generate the URL for the login form endpoint. If an exception is raised during this process, the function catches it and uses the flash function provided by Flask to store the error message in a message queue. Finally, the function redirects the user back to the registration form using the redirect function and the url_for function to generate the URL for the registration form endpoint.
Verify the Progress


If there is any mistake or confusion check the github repository or you can leave a comment here.
Resources
Login and Register HTML & CSS Source Code: https://www.codinglabweb.com/2022/11/free-login-registration-form-html-css.html