Docker Best Practices
Using Docker Official Images to Multistage Builds

As a seasoned senior web developer with a wealth of experience in Python, Javascript, web development, MySQL, MongoDB, and React, I am passionate about crafting exceptional digital experiences that delight users and drive business success.
Docker is the most used tool for containerizing applications. Containers play an important role in enabling one environment for all systems. Docker is the answer to the statement, It works in my system. Every microservice heavily depends on the containers as these are lightweight, reliable, and secure. Docker is the most efficient way of containerizing an application. Docker can be natively run on Windows, Mac, and Linux. What Docker, or any container, does is sit between the system kernel and the user application, allowing the application to have its isolated environment and use system resources to run processes. Docker has such an impact on the tech industry that all the major Operating Systems were forced to support Docker natively. We can assume that Docker will continue to be the leader in containerization tools. Getting to know run Docker containers efficiently and more securely can help us become better developers.
Selecting the Right Image
There are a lot of Docker images available on Docker Hub. Selecting the right image is the first step in Docker. Base operating system images are bigger and contain a lot of pre-installed packages that are not needed to run the application. You can choose your application-specific images. For example, instead of selecting a Debian image and then installing Node, you can choose a Node base image.
Selecting an application-specific base image can also raise errors. Suppose you selected node:latest image today. After a node version is released, the node version in the node:latest image will change. So choose the specific version that your application supports. Sometimes, you have to consider the base OS image along with the version. For example, python:3.11-alpine may not be suitable for big and complex projects because some cPython libraries may break due to musl. So, you may have to go for python:3.11-slim. Understanding the image you are using is very important, otherwise, you may see some errors that can be a nightmare to debug.
Use of the Cached Layer
When you pull an image from Hub or build one on your local machine, the layers of the image are cached by Docker. This helps in reducing pull or build time. But there is a catch. If you change the script in your Dockerfile file, then Docker will not use cached layers from that line to the end of the Dockerfile. Example,
Initial Dockerfile
# Stage 2: Runtime - lightweight Python image
FROM python:3.11-slim

WORKDIR /app

RUN useradd tom

# Copy venv from builder
COPY requirements.txt .

RUN pip install -r requirements.txt

# Copy Flask app code
COPY ./app.py .

# Expose Flask default port
EXPOSE 5000

USER tom

# Run Flask app (adjust `main:app` to your file/instance name)
CMD ["flask", "run", "--host=0.0.0.0", "--port=5000"]
Updated Dockerfile
# Stage 2: Runtime - lightweight Python image
FROM python:3.11-slim

WORKDIR /app

RUN useradd tom

# Copy venv from builder
COPY requirements.txt .

RUN pip install -r requirements.txt

# Copy Flask app code
COPY . .

# Expose Flask default port
EXPOSE 5000

USER tom

# Run Flask app (adjust `main:app` to your file/instance name)
CMD ["flask", "run", "--host=0.0.0.0", "--port=5000"]
I have changed the line where I have used the COPY command. When I ran the build command, the cached layers were used for all commands before COPY. Starting from COPY, all the layers were re-created.
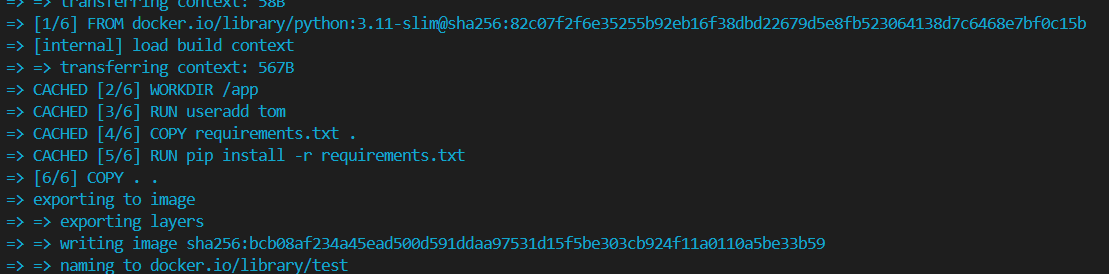
Always put the commands with the least probability of change before the ones with high probability. You may think building an image takes a few seconds or a minute, so why should you bother? The reason is to quickly build and publish an image from the CI/CD pipeline. Suppose a project runs on 20 microservices. Each service is being built and deployed to the staging environment every few hours. The agents that build and publish the image have to create a new image a few times in an hour. Using a cached layer effectively will reduce the deployment time significantly.
.dockerignore File
When you run your application locally, you generate files that should not be copied to the build image. For example, in the case of NodeJS, node_module and build folders. In the case of Python, you don’t want to copy the .venv and __pycache__ folders. You can mention these unwanted folders and files in the .dockerignore file.
.dockerignore example
.venv
__pycache__
Switch to a non-root User
By default, Docker uses the root user to run your application. If the container gets compromised, the hacker will have root access in the container. To enhance the container security, you can either define a user or use the generic user. The generic user is not available in all images. Node images come with a generic user node, but Python images do not. You can create a user using the Linux command useradd username. Before the cmd command, you can set the new user as the active user.
# Stage 2: Runtime - lightweight Python image
FROM python:3.11-slim

WORKDIR /app

RUN useradd tom

# Copy venv from builder
COPY requirements.txt .

RUN pip install -r requirements.txt

# Copy Flask app code
COPY . .

# Expose Flask default port
EXPOSE 5000

USER tom

# Run Flask app (adjust `main:app` to your file/instance name)
CMD ["flask", "run", "--host=0.0.0.0", "--port=5000"]
If you log in to the Docker container, you will be logged in as user tom.

Multi-stage Builds
If an application is built using Go, Rust, or a similar programming language, then you must use a multi-stage build to copy the binary to the final image and run the application. This reduces the final image size.
What the hell is a multi-stage build?
Multi-stage is when you use multiple FORM statements. The final image is based on the last FORM statement. Multi-stage can also be used for dynamic programming languages as well. Using application-specific images can help in controlling image size, but base OS images are faster. If your service handles more requests than other services and needs a performance boost, using a base OS image can be a better option.
But you can do it in the single-stage build as well. Then why bother about the multi-stage build?
For example, copying the requirements.txt file and installing the packages can increase the layer count and final image size. Multi-stage build can help us install the packages in the first stage and then copy the packages into the final image. This reduces the final image size significantly. Based on your application needs, you can choose small base OS images like Alpine as well. Once you've copied the required files into the final build, configure the OS to use the copied files and follow the other generic steps. It is better to use the same images in all build stages.
# -------------------------------
# Stage 1: Builder (Python 3.11)
# -------------------------------
# Use Debian as the base image for building
FROM debian:bookworm AS builder

# Install Python 3.11, pip, and venv module
RUN apt-get update -y && \
    apt install -y python3 python3-pip python3-venv

# Create a virtual environment in /opt/venv
RUN python3 -m venv /opt/venv

# Set the environment PATH to use the virtual environment
ENV PATH="/opt/venv/bin:$PATH"

# Copy the requirements file
COPY requirements.txt .

# Install Python dependencies inside the virtual environment
RUN pip3 install --no-cache-dir --upgrade -r requirements.txt


# -----------------------------------------------
# Stage 2: Runtime (Debian Bookworm + Python 3.11)
# -----------------------------------------------
# Use Debian as the final runtime image
FROM debian:bookworm

# Install system Python (should match venv's Python version)
RUN apt-get update -y && \
    apt install -y python3

# Create a least-privileged user to run the app
RUN addgroup --system appgroup && \
    adduser --system --ingroup appgroup appuser

# Copy the virtual environment from the builder stage
COPY --from=builder /opt/venv /opt/venv

# Copy the application code into /app and set correct permissions
COPY --chmod=775 . /app

# Set working directory
WORKDIR /app

# Use the virtual environment’s bin directory for all commands
ENV PATH="/opt/venv/bin:$PATH"

# Run the app as the non-root user
USER appuser

# Expose port 5000 for the Flask app
EXPOSE 5000

# Command to run the Flask application
CMD ["flask", "--app", "app", "run", "--host", "0.0.0.0"]
Comparison of Image Size
Single Stage:

Multi-Stage:
